The E major chord on the ukulele is relatively one of the most difficult chords to master. However, with a fair amount of practise and focus, anyone can play the E major chord on the ukulele.
Also known as the E chord, the E major chord is a four finger chord. So, this chord needs all four fingers on all four strings to get the sound of E major.
There are so many different ways we can play the E chord on the ukulele. Let us explore the different positions of the E major chord on the ukulele! But first, let’s find out the notes that make up the E major chord.


Notes in the E major chord
No matter what instrument you play, whether it is the guitar, piano or ukulele, the notes of E major chord will always be the same. The notes that make up the E major chord are E, G# and B. It is worthwhile to remember the major chords consists of the 1st, 3rd and 5th notes of the respective major scale.
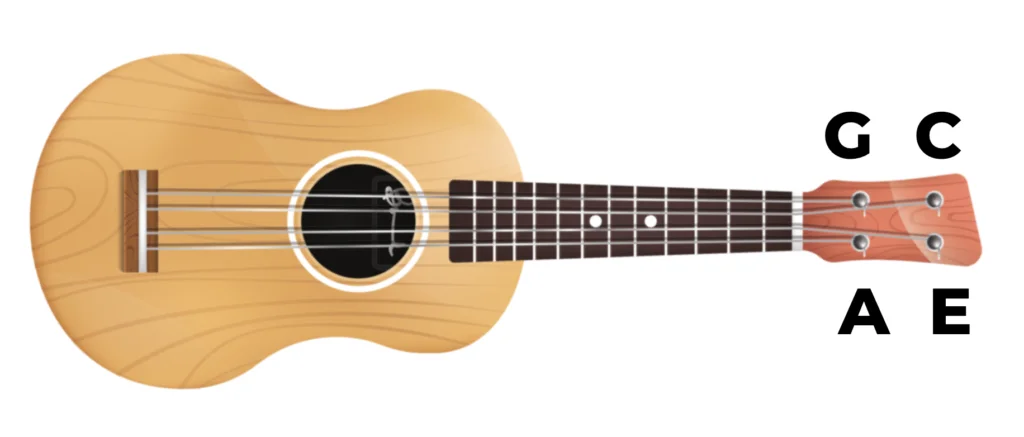
How to tune the ukulele in standard tuning
Before we play the E major chord, let us first understand how to tune the ukulele in standard tuning using ukulele tuner. It works for both guitars and ukuleles!
Now, let’s see how we can tune the ukulele in standard tuning:
- Start by tuning the 4th string to G (or G4 )
- Next, tune the 3rd string to C (or C4 )
- After that, tune the 2nd string to E (or E4 )
- Finally, tune the 1st string to A (or A4 )
How to play the E major chord on Ukulele
Now that the ukulele is tuned properly, let’s take a look at the diagram below to understand how to hold the E chord. There are finger numbers inside the circles, which tells us which fingers to use. As you can see this chord requires all our four fingers pressed in a particular shape to play the E chord.
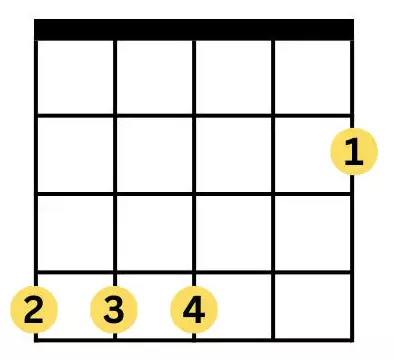
These are the particular fingers which hold the E chord:
- The 2nd finger (middle finger) holds the 4th string at the 4th fret.
- The 3rd finger (ring finger) holds the 3rd string also at the 4th fret.
- The 4th finger (little finger) holds the 2nd string also at the 4th fret.
- The 1st finger (index finger) holds the 1st string at the 2nd fret.
Now, let’s strum all the four strings in one stroke with our strumming hand. That’s it! We can now play the E chord perfectly on the ukulele.
Alternate finger positions for the E chord Ukulele
Yes, there are many different ways we can hold and play the same E major chord. You can play the exact same notes using different fingers too. Here’s a couple of different finger positions to play the same chord shape:
Alternate fingering #1
We can play the E chord just by using three fingers instead of all four fingers. This makes it relatively easy to hold and play this chord. The image below shows the finger positions. So, let’s see how to hold this chord without the pinkie (the 4th finger):

- Start by pressing the 3rd string at the 4th fret with the middle finger (2nd finger)
- Next, press the 2nd string also at the 4th fret with the ring finger (3rd finger)
- Finally, press the 1st string at the 2nd fret using your pointer (1st finger)
Well, this seems to be much easier! But, only the three strings being held down with your fretting hand can be played. Therefore, we strongly recommend to practise the previous version using all four fingers.
Alternate fingering #2
Here, we will use the barre technique. We’ll use the third finger to hold more than one string while making sure we don’t mute the 1st string (A string). Let’s follow these steps to play the same E chord using alternate fingering:
- Start by flattening your ring finger (3rd finger) and press the 4th, 3rd and 2nd strings at the 4th fret.
- Now, use your index finger (1st finger) and press the 1st string at the 2nd fret.
At first, this chord may sound muffled. This is because the ring finger barring the lower strings is touching the 1st string (A). So, try bending it a little to avoid it from touching the A string. It’s not so easy now, but with practise it will get better.
Practise the E chord using these fingers as this shape can be used to play other major chords on different frets as you move forward to play more chords. You can learn to play Happy Birthday if you want to play an easy song to start your Ukulele music journey.
Interestingly, there are other chord shapes of the E chord using different frets, some that are over and above the 4th fret. These chord positions may sound higher in pitch, but they have the same notes E, G# and B of the E major triad. Let’s see what they are.
E major ukulele chord – 2nd position
The 2nd chord position of the E chord has notes between the 7th and 9th frets of the ukulele. This chord position requires us to use all four of our fingers as shown in the diagram below. Let’s break it down step-by-step to understand how to hold this chord shape:
E major ukulele chord finger position using 7th fret

- Start off by placing your little finger (4th finger) on the 4th string at the 9th fret.
- Next, place the ring finger (3rd finger) on the 3rd string at the 8th fret.
- After that, keep your pointer (1st finger) on the 2nd string at the 7th fret.
- Finally, use your middle finger (2nd finger) to press the 1st string also at the 7th fret.
Well, this finger placement is quite hard to get used to. Fortunately, here is an alternate finger placement to hold the same chord shape on the same frets. Let’s find out how!
Alternate finger placement for the E chord – 2nd position
So, let’s see an easier alternate way to play this chord within the same frets. Looking at the diagram below, this chord shape looks close to the F major chord shape on the guitar. Let’s follow a step-by-step method to hold this chord.
Alternate E major ukulele chord finger position using 7th fret

- Begin by pressing the 4th string at the 9th fret with your ring finger (3rd finger).
- Next, push the 3rd string with your middle finger (2nd finger) at the 8th fret.
- Now press both the 2nd and 1st strings by flattening your pointer (1st finger) at the 7th fret.
There! Not so difficult, is it? It may be tough for the pointer to hold down both strings at the same time. This is something you will get used to over time.
E chord – 3rd position
Now we’re about to play a much higher position of the E major chord i.e., the 3rd position of the E chord. This chord shape looks similar to the D major chord (open position) on the guitar. So, let’s refer to the diagram below and follow the steps to hold and play this chord between the 9th and 12th frets.
E major ukulele chord finger position using 9th fret

- Place your pointer (1st finger) on the 4th string at the 9th fret.
- Next, press the 3rd string at the 11th fret with your middle finger (2nd finger).
- After that push your pinkie (4th finger) on the 2nd string at the 12th fret.
- Finally, flex your ring finger (3rd finger) behind to press the 1st string at the 11th fret.
It may be difficult to shift to this particular chord position, since it is so high up the fretboard. The frets are also much closer to each other. For bigger hands, this could also pose a problem.
Here’s an alternate finger placement for this particular chord shape which may be helpful.
Alternate E major ukulele chord finger position using 9th fret

- Keep the pointer (1st finger) at the same place (on the 4th string at the 9th fret).
- Barre the 3rd, 2nd and 1st strings at the 11th fret with your ring finger (3rd finger).
- Keep the pinkie (4th finger) on the 2nd string at the 12th fret.
Alternate finger placement for the E chord – 3rd position
This is a slightly different way to hold the same E chord in the 3rd position using the same frets. We’ll be using three fingers this time instead of four. Will this be easier? Let’s check out the diagram below, follow the steps and figure it out!
Practically, the 3rd position of the E chord is not played as much it’s lower positions. But, it does sound great if played at the end of a song or as a finishing touch at the end of a solo. Try it out and listen for yourselves!
Tips to play better
Play all the strings one at a time to see which string is muting. Then, press that finger harder to get a clean sound from that particular string. After that, proceed to strumming all the strings to get a clean sounding chord strum. This should be your rule of thumb when you practice any of the above chords shapes with different finger placements.
Once you can play the chords clearly, you can proceed to practising chord strums with other related chords. Learn to shift from chord to chord without cutting off the previous chord. Later, try practising along with a metronome to play at a steady tempo.
I hope you’ve learned something from this blog. Whether you’re practising by yourself or playing to a crowd, don’t forget to have fun!
Related blog: F minor ukulele chord