Beethoven and Mozart have a few things in common. First of all, they are legendary musicians, who have composed great music, and secondly, the most crucial aspect was their music companion “the piano.” The various melodies and tunes that the keys on the piano can produce are astounding. In this blog, we will learn about the instrument piano and how to begin your journey of becoming a pianist.


Creation of the Piano
Before we dive into how to play the piano. Let’s get to know a bit about the instrument and how it came to be.
The invention of the piano took place in late 17th and early 18th century Italy. The inventor of the instrument was the instrument maker Bartolomeo Cristofori. The piano can also be seen as the successor of the harpsichord. As Bartolomeo switched the plucking mechanism of the instrument with a hammer giving the world the instrument piano.
As time passed more minute inventions and technical complexities were added to the piano resulting in the birth of various piano types.
The Parts of the Piano
Knowing about the parts of the piano is the first step toward understanding the instrument.
Keyboard
Let us start with the part with which the pianist interacts the most; “the keyboard”. An average keyboard of a piano consists of 88 keys. The keys are further divided into two sets, the black keys and the white keys. Out of the 88 keys, there are 36 black keys and 52 white keys. The black keys are shorter and elevated. These keys are sometimes referred to as the “enharmonic” or as “sharps” and “flats” as they produce the sound of “accidental notes”. On the other hand, the white keys are long and flat, and they are referred to as “naturals” as they produce the sound of the natural notes.
Housing/ Case and Lid
It is the structure that houses the instrument thus the name housing. It is the largest part of the instrument. The shape and size of the housing of the instrument can be different based on the type of piano.
Hammer and Strings
The main protagonists of the piano are the hammer and strings. Located inside the housing under the lid. The keys on the keyboard are attached to the hammers. So, when one presses the keys, the hammer elevates impacting the strings. Each string is arranged and tuned in a certain manner for producing a specific sound or a note through a specific key.
Damper
The damper is the mechanical component that acts as a stopper. Since, the damper is a soft cloth or a felt it helps in muting the excess vibrations. Which are produced when the string is struck by the hammer in a piano. When the key is played the damper acts as a barrier and does not let the note linger or bleed thus giving a clean cut to the sound that is produced.
Pedals
Lastly, let’s talk about the part which is located at the foot of the instrument the pedal. Depending on the type of piano the number of piano pedals varies. Usually, an average piano has three pedals namely “Una Corda” or the “soft pedal” the “Sostenuto” pedal, and the “damper” or the “sustaining” pedal. The pedals are used for changing the tone of the piano in different ways.
Music theory is a pivotal part when learning the piano. Thus, acquainted getting with the theoretical part of music is important in order to play the piano. So, let’s look into the topic of Musical Notations.
Musical Notations
Music has a world of its own which has a variety of methods, subjects, and topics that one must need to learn in order to become a musician. Music is often referred to as a language and the musical notations are the grammar and text of that very language. When learning the language of music, one should not only speak but should also be able to read and understand the language.
Since the knowledge of music could not solely be imparted or taught only through listening or orally. Musicians came up with different ways and techniques such as visualizing the musical frequency and sounds for easy learning. The musical sounds are also given various names and symbols to them. While covering the concept “Musical Notations’’ will look into a few topics such as stave, notes, octaves, and many more.
The Stave/Staff
Let’s start from the very beginning. We all can also write down music. Thus, we humans invented musical systems comprising different symbols and musical formats. One of the essentials of the musical format which helps in forming the base for music for writing is a stave or a staff.
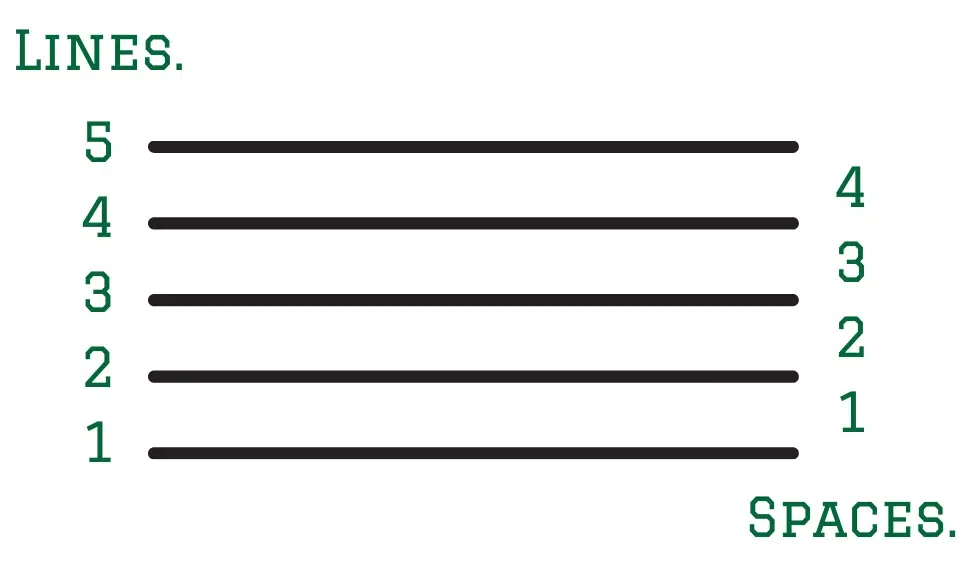
A stave or a staff refers to a set of lines and spaces. Which are horizontally aligned throughout a music sheet. The set of lines and spaces comprises 5 lines and 4 spaces. The following image highlights the lines and the spaces on a stave. The lines are labelled in red and spaces in green
The mechanics of a stave/staff
As mentioned previously the stave comprises 5 lines and 4 spaces. Each line and space are extremely significant when writing music. A note can be placed on a line or a space of the stave. Each line and space represent different musical notes. Each note on the stave represents a natural note.
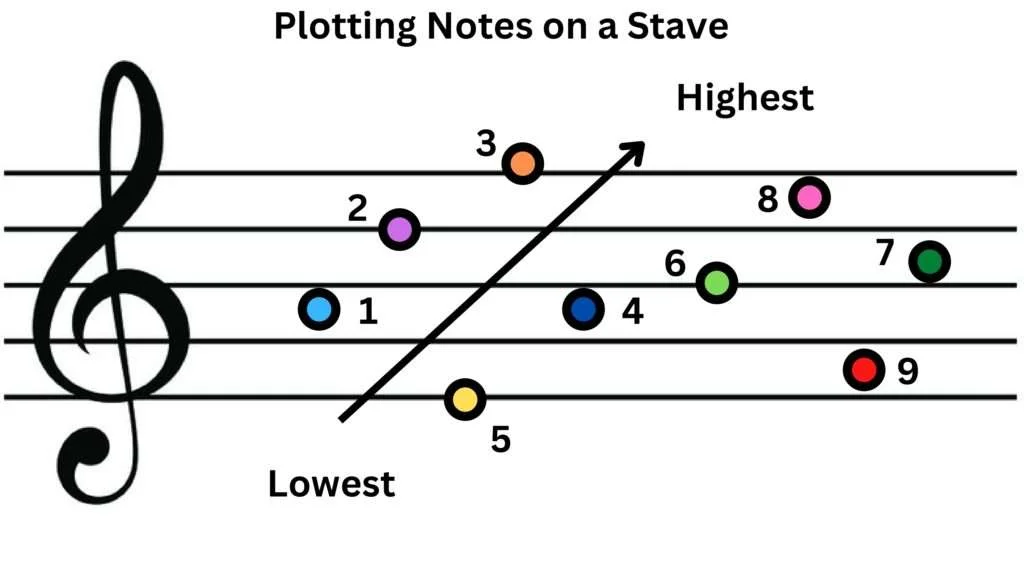
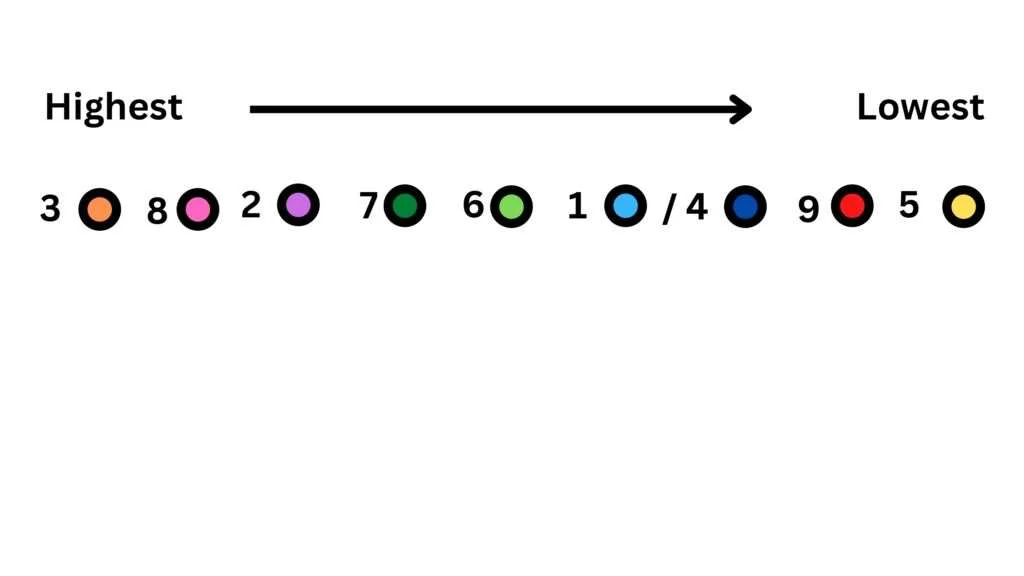
The higher the note is located the higher the pitch of the note gets. The correct way of reading music or the notes on the staff is to read the notes from the bottom to the top. The following picture has a stave and different notes allotted on it. Try to rank the notes from the highest to lowest and then scroll down for the answer.
Measure in Music
A measure in music comprises a set number of beats in a single unit of time at a specific tempo. The musical compositions are broken down into measures for a better understanding. The sectioning of the compositions in measures increases the ease for the musicians to read the music sheets. It also helps in organizing the long sections of the music composition into smaller parts. For symbolizing a measure on a music sheet we use two bar lines.
Types of Bar lines
There are different kinds of bar lines and we will learn about a few of the bar lines.
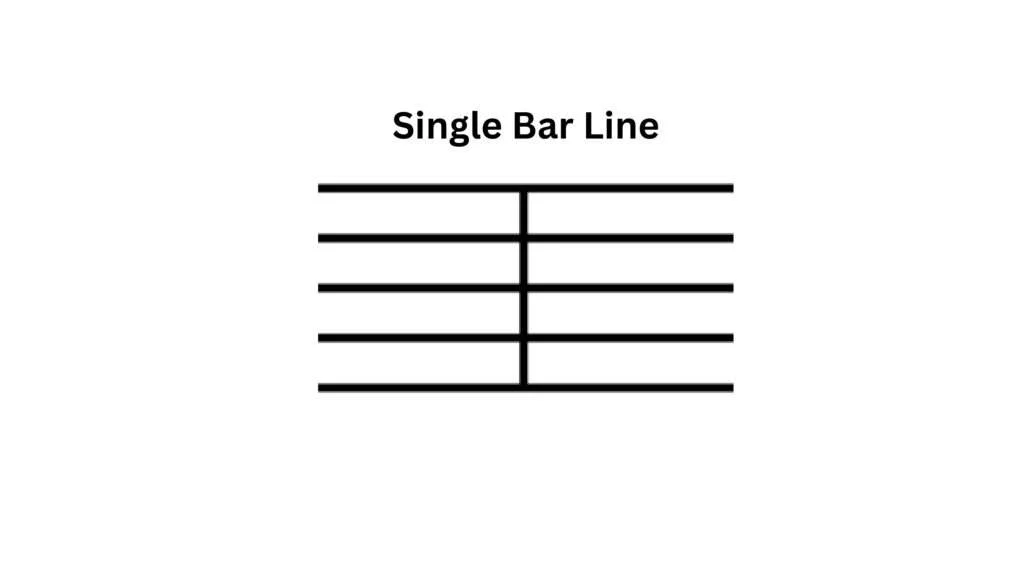
Single Bar Lines
A single bar line is a vertical line that is drawn on the musical staff. It denotes the end of a measure and the beginning of another measure. The following image is the picture of a single bar line on a stave.
Double Bar Lines
To denote a double bar line two vertical lines are drawn one after another. The double bar line signifies the end of a section of the composition and the beginning of the next section. The following image is a picture of a double bar line on a stave.

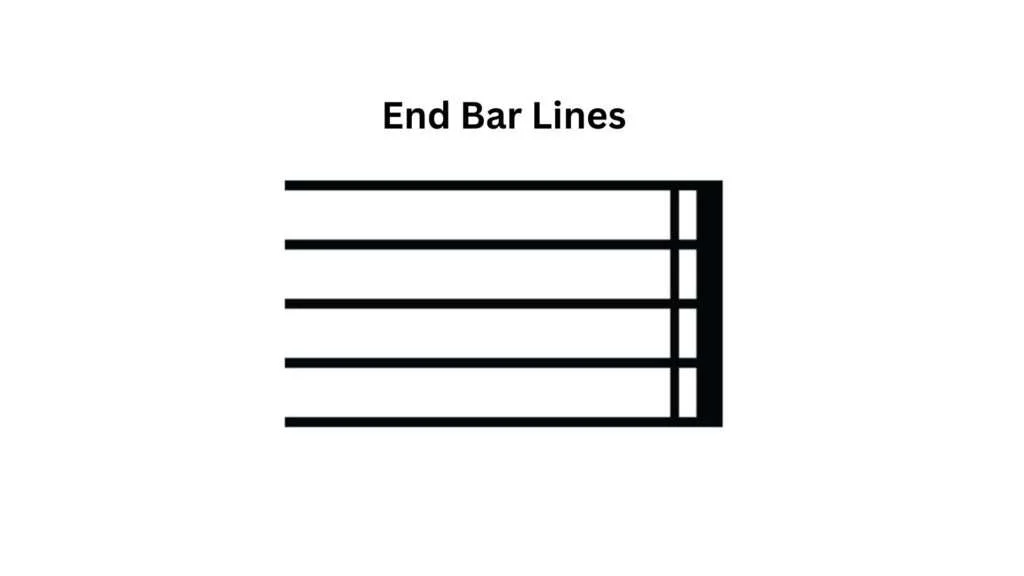
End Bar Lines
End bar lines are drawn at the end of an entire composition. 2 vertical lines are used to denote the end bar lines. Among the two vertical lines, the second line is thicker than the first. The following image is a pictorial representation of the end bar lines on a stave.
Start Repeat
The start repeat comprises two vertical lines bar lines. The first line is thicker than the second one accompanied by two dots. It is used to indicate the first measure of a repeated section. The following image is a pictorial representation of a start repeat on a musical stave.

End Repeat
The end repeat comprises two vertical line bar lines the second line is thicker than the first line and it is also accompanied by two dots. It is used to indicate the final measure or the last measure of a repeated section. The image above also comprises the pictorial representation of and repeat on a musical staff.
Time Signature
Time signature helps in understanding the beats of a musical composition. In other words, it refers to the number of beats present in a measure. The time signature is represented by the fractional numbers written at the beginning of a musical stave. To learn more about time signature in detail check out our article “Time Signature.”
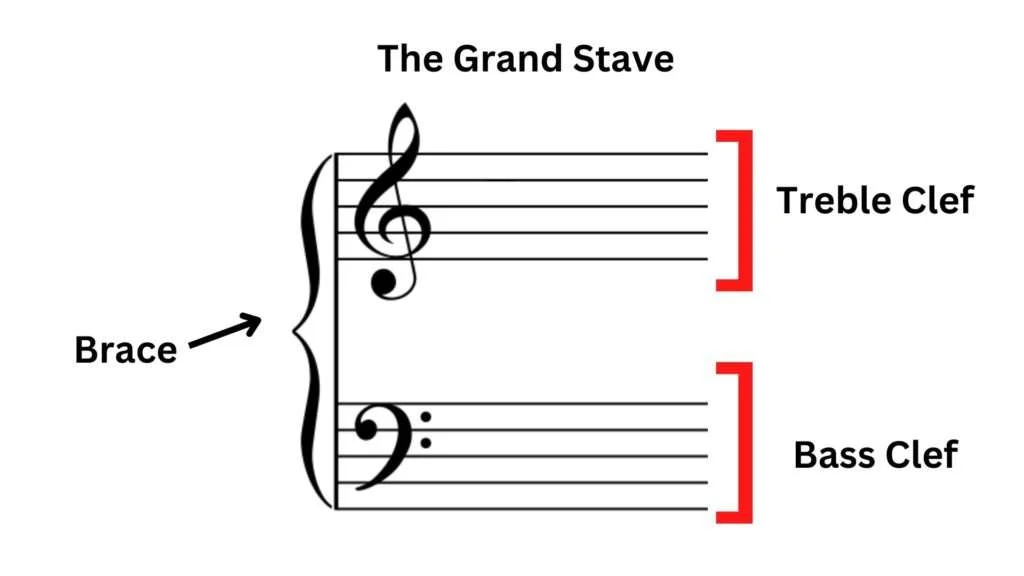
The Brace
The brace refers to the curvy black line that is drawn at the beginning of a musical stave. The brace works as a connecter between clefs. One of the most common uses of the brace is seen in piano music and is used to represent the grand stave.
The Grand Stave
The Grand stave consists of 2 staves that represent specific parts of a piano. The purpose of joining the 2 staves is to accommodate the wide range of notes present in a piano. The two staves comprise 2 different clefs; the treble clef and the bass clef. The treble clef is drawn on the upper stave and the bass is drawn on the lower stave. The brace joins the two staves together. The following image is of the grand stave and the brace.
The Clefs
The clef is a symbol written at the beginning of a stave. The clefs are used for determining the pitch of the notes. There are different types of clefs in this blog and we will introduce you to a few of them
Treble Clef
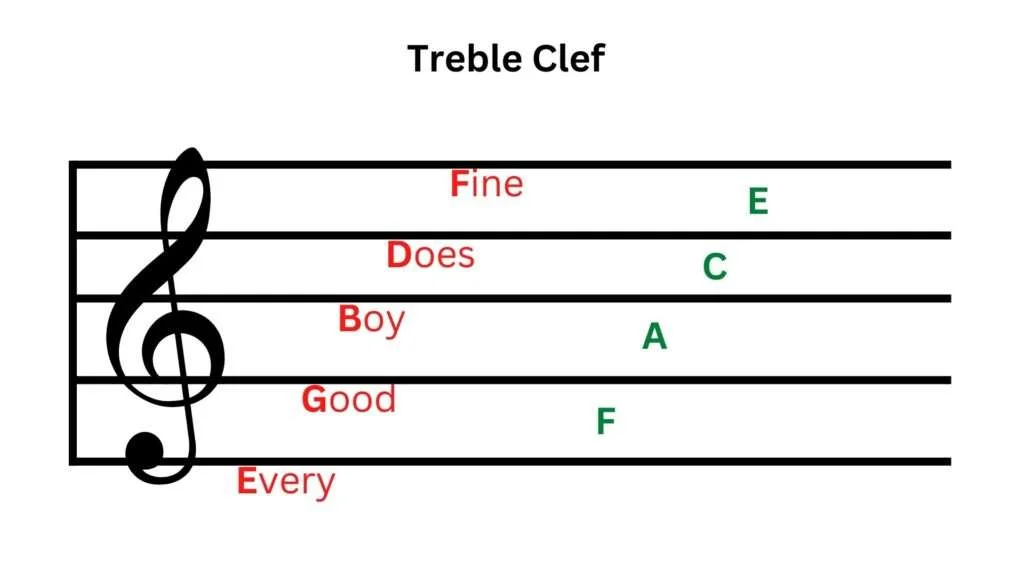
It is among the most common clefs used in music. It is one of the first clefs that musicians learn when learning music. The treble clef is also known as the G clef as the starting point of the symbol is on the second line of the stave, which denotes the note G. The treble clef is used for denoting high-pitched instruments such as violins, flute, the right-hand side of the piano and many more. The notes allotted to the stave lines and space are as following in for the treble clef.
Lines: 1 – E, 2 – G, 3 – B, 4 – D, 5 – F, and for the Spaces: 1 – E, 2 – C, 3 – A, 4 – F
To memorize the placements of the notes, musicians have come up with mnemonics. There are two sets of mnemonics one for the lines and the other for the spaces on the stave. The mnemonics for the treble clef are as follows:
For the notes on the lines: Every Good Boy Does Fine.
For the notes on the spaces: FACE
The image below is of the symbol used to denote the mentioned clef and is also the pictorial representation of the notes on the treble clef.
Bass Clef
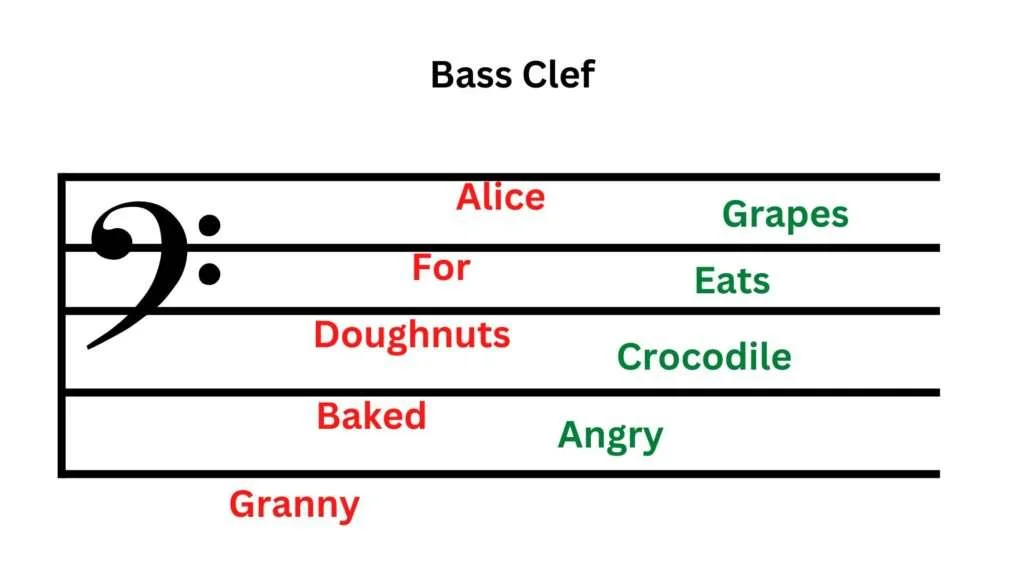
It is again one of the most used clefs in music. It is usually introduced after the treble clef. The bass clef is also known as the F-clef because the starting point of the symbols lies on the 4th line or the line that denotes the note F. The bass clef is used to represent low-pitched instruments such as the cello, double bass, and the lower half of the piano. The notes allotted to the stave lines and spaces for the bass clef are as follows:
Lines: 1 – G, 2 – B, 3 – D, 4 – F, 5 – A, and for the Spaces: 1 – A, 2 – C, 3 – E, 4 – G
The two sets of mnemonics for the bass clef are follows:
For the notes on the lines: Granny Baked Doughnuts For Alice.
For the notes on the spaces: Angry Crocodile Eats Grapes.
The image below is of the symbol used to denote the mentioned clef and is also the pictorial representation of the notes on the bass clef.
Alto Clef
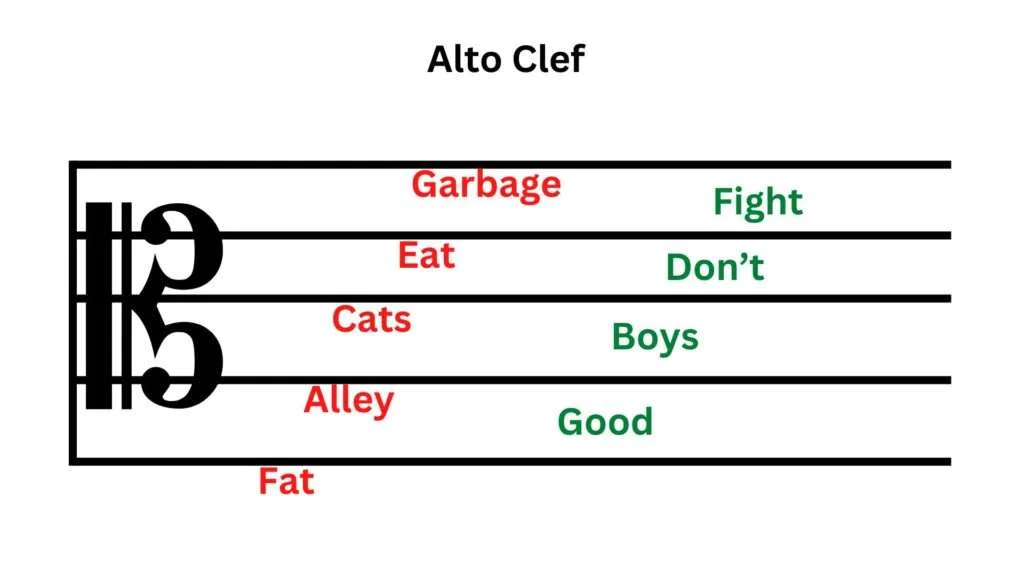
Alto clef is one of the lesser-known clefs. It is also called the C-clef as the center of the symbol that is used to represent the clef lies on the 3rd line of the stave which denotes the note C (Middle C). It is used for the instruments such as viola and alto trombone. The notes allotted to the stave lines and spaces for the bass clef are as follows:
Lines: 1 – F, 2 – A, 3 – C, 4 – E, 5 – G, and for the Spaces: 1 – G, 2 – B, 3 – D, 4 – F
The two sets of mnemonics for the bass clef are as follows:
For the notes on the lines: Fat Alley Cats Eat Garbage.
For the notes on the spaces: Good Boys Don’t Fight
The image below is of the symbol used to denote the mentioned clef and is also the pictorial representation of the notes on the alto clef.
Tenor Clef
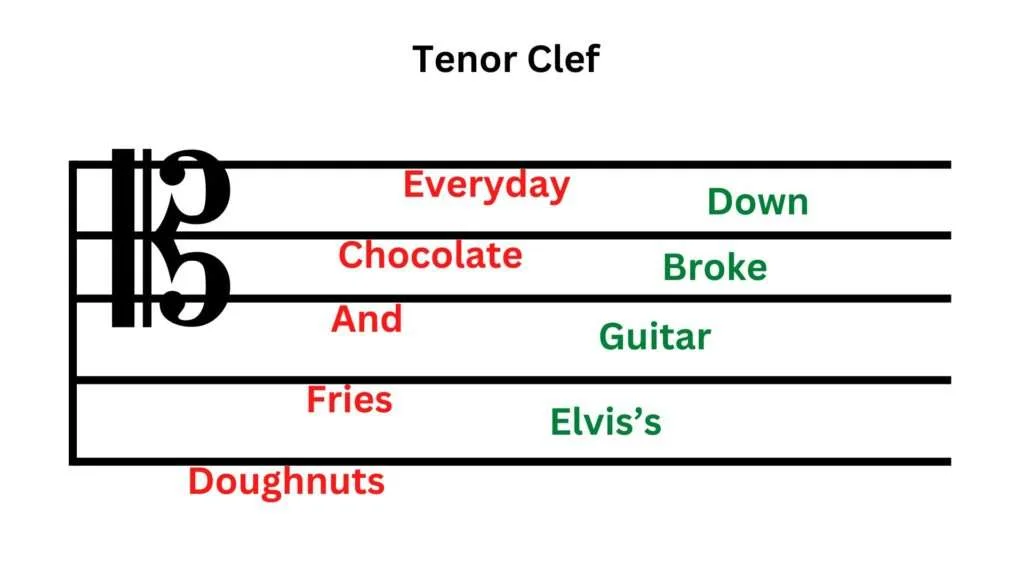
Tenor clef is another one of the lesser-known clefs. It is also called the C-clef. Though the middle of the symbol shifts from the 3rd line to the 4th line of the stave. It is used for denoting the upper ranges of the instruments like bassoon, cello, trombone, etc. The notes allotted to the stave lines and spaces for the tenor clef are as follows are as follows:
Lines: 1 – D, 2 – F, 3 – A, 4 – C, 5 – E, and for the Spaces: 1 – E, 2 – G, 3 – B, 4 – D
The two sets of mnemonics for the tenor clef are:
For the notes on the lines: Doughnuts Fries And Chocolate Everyday.
For the notes on the spaces: Elvis’s Guitar Broke Down.
The image below is of the symbol used to denote the mentioned clef and is also the pictorial representation of the notes on the tenor clef.
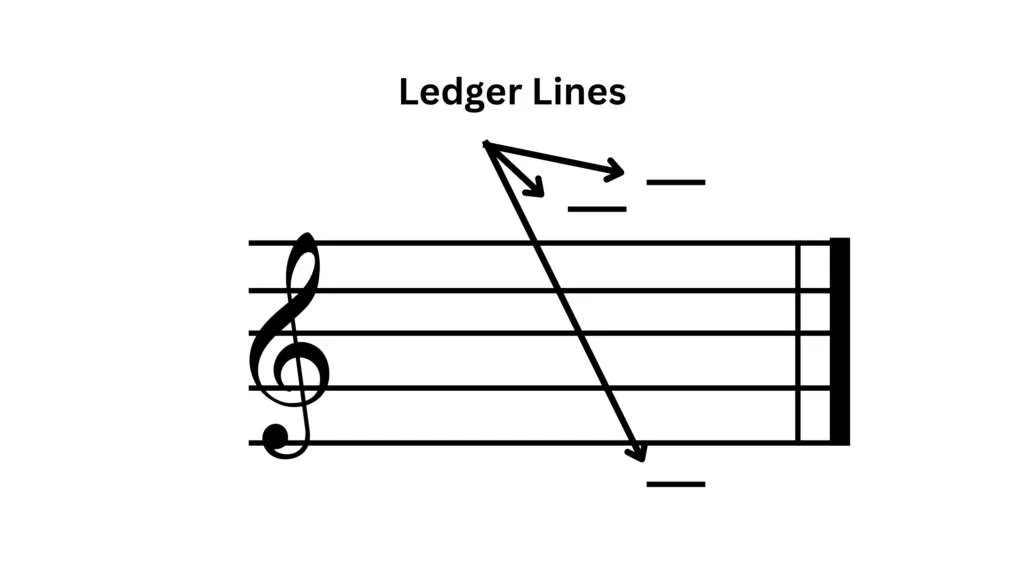
Ledger Lines
Many a time musicians run out the space to write notes. So, they extend staff. The staff can be expanded. That is possible through the ledger lines. Ledger lines are short lines that are written above and below the set lines of the staff. The notes are written on the lines the notes are too high or low. The following image is an example of ledger lines.
What is an octave?
Western music consists of 12 pitches and these pitches repeat after a specific period of interval. The interval is known as an octave. The octave is a musical interval between 2 notes with the same letter name. The sound wave frequency of the highest note of an octave is twice the vibration of the lower note. Since all the notes are referred to by a set of alphabets. For distinguishing between the different octaves we allot the alphabets different numbers according to their pitch and level of the octave.
On a piano, the octaves consist of 8 white keys including both the C’s. Allotting the lowest C on the piano with the number 1 and the highest C with the number 8. Dividing the octaves further into different manners such as chromatic scale, major scale, and minor scale. For better understanding, the list below consist of a few of the octaves with the pitch and the notes that the octave consists of followed by an audio sample.
| Octaves | Notes | Pitch |
| 1 – Octave | C1 – B1 | Very low |
| 2 – Octave | C2 – B2 | Low |
| 3 – Octave | C3 – B3 | Moderately low |
| 4 – Octave | C4 – B4 | Medium |
| 5 – Octave | C5 – B5 | Moderately high |
| 6 – Octave | C6 – B6 | High |
| 7 – Octave | C7 – B7 | Very high |
What are musical notes?
When singing we often come across the term note. We try to hit the notes correctly. But we forget to ask the question. What is a note? In music, notes are musical names given to different pitches. Pitch is the vibration of the vocal cords when producing a sound. It refers to the frequency that of the sound which can go from high frequency to low frequency. If you want to learn more about pitch and how to sing on it Check out Singing on Pitch.
Thus, these notes are used as indicators for locating the pitch and also the duration of the musical sound. Western music consists of 12 notes in total. The notes are then divided into further categories.
Natural Notes
Let’s go a little deeper and talk a bit more about the natural notes. Just as mentioned above western music consists of 12 notes. Out of those 12 notes, 7 of the notes are known as natural notes. To denote the natural notes we use capitalized letters A B C D E F G. To understand it better the natural notes are the white keys on the piano.
Usually, the starting point is from note C. one should notice that note C is placed on the left-hand side of a set of 2 black keys. As one keeps going toward the keys on the piano’s right-hand side. The pitch simultaneously keeps getting higher.
Middle C
One of the most popular notes is the “C” note. Also, known as C4. The key for C4 is exactly positioned at the piano. Thus, naming C4 the middle C. The middle C is extremely popular and widely used for musical composition.
Sharps and Flats
The remaining 5 notes are put into the categories of sharps and flats notes. When there is a rise in pitch it is known as a sharp note and when the pitch lowers it is known as flats note. The sharp and the flat notes are also called the accidentals or accidental notes. The difference between the sharp and the flat notes can be done on the basis of following factors:
- Pitch: The sharp notes are a semitone higher in simpler words a half note higher in pitch. Similarly, the flat notes are a semitone lower or a half note lower in pitch.
- Color: On the piano, the flats and sharps are the black keys.
- Symbols: Similar to natural notes the sharp and the flat notes are also denoted by capitalized alphabets but along with the alphabets certain symbols are written next to them to help in differentiating between the natural notes, sharp notes, and the flat notes. For the sharp note the symbol “#” and for a flat note “b” is used. Both symbols are used in the key signature or are present throughout the musical score.
Whole steps and Half steps
When going from one note to another is known as steps. Categorizing the steps in different groups on the basis of the amount of distance that that step covers.
- Half Steps: If the distance is covered one interval at a time or covers the distance through all the 12 notes it is known as half steps or semitones. On a piano, the half step is the distance between white keys or white keys and black keys that is immediately present on its left-hand side or right-hand side.
- Whole Steps: If the distance between covers two intervals at a time or covers the distance of to half steps in a single step is known as the Whole step or whole tone. On a piano, a whole step skips the keys that are immediately present on the left-hand side or the right-hand side of the chosen key.
Musical Notes and Durations
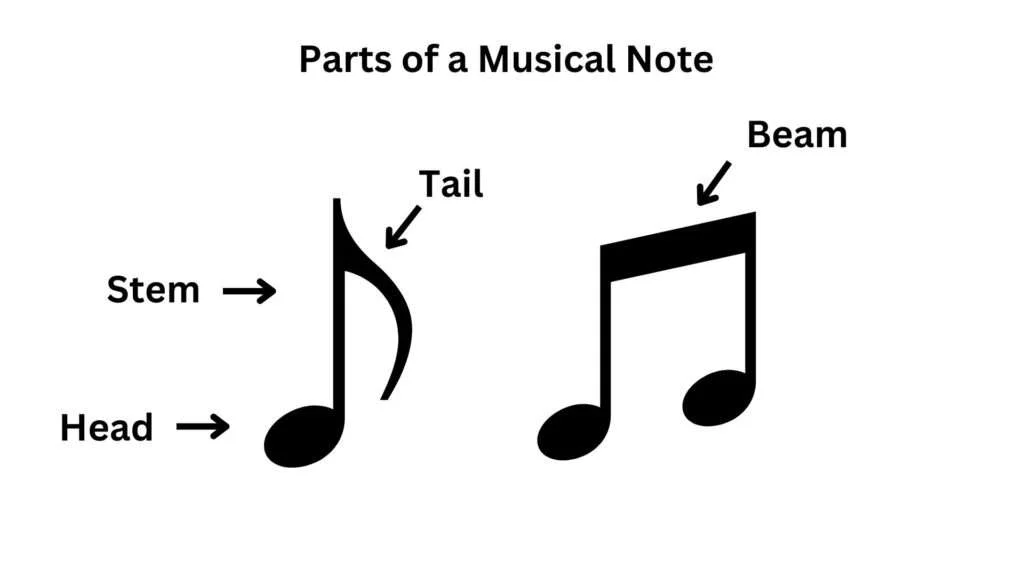
Learning musical notes is one of the key essential ingredients for reading music. The musical notes also help in identifying and determining the duration of the notes and the beats or counts present in a measure. Thus, they can be categorized based on the duration a note lasts. The notes have also been given different symbols. Before we start learning about different notes, let us discuss the various parts of symbols for more clarity and a better understanding of the notes.
The circular/oval shape is known as the “Note head.” The long vertical line attached to the note head is known as the “Stem” the little curved line on the top right-hand side of the stem is known as the “Tail” and finally, the horizontal line attaching 2 stems is known as the “Beam.” The following pictures comprise the labeled parts of the symbol.
Few things to keep in mind when learning about the notes; All notes last for a certain amount of duration. But the beats that a measure consists of depending on the time signature. Thus, we will be discussing the relative duration of the notes.
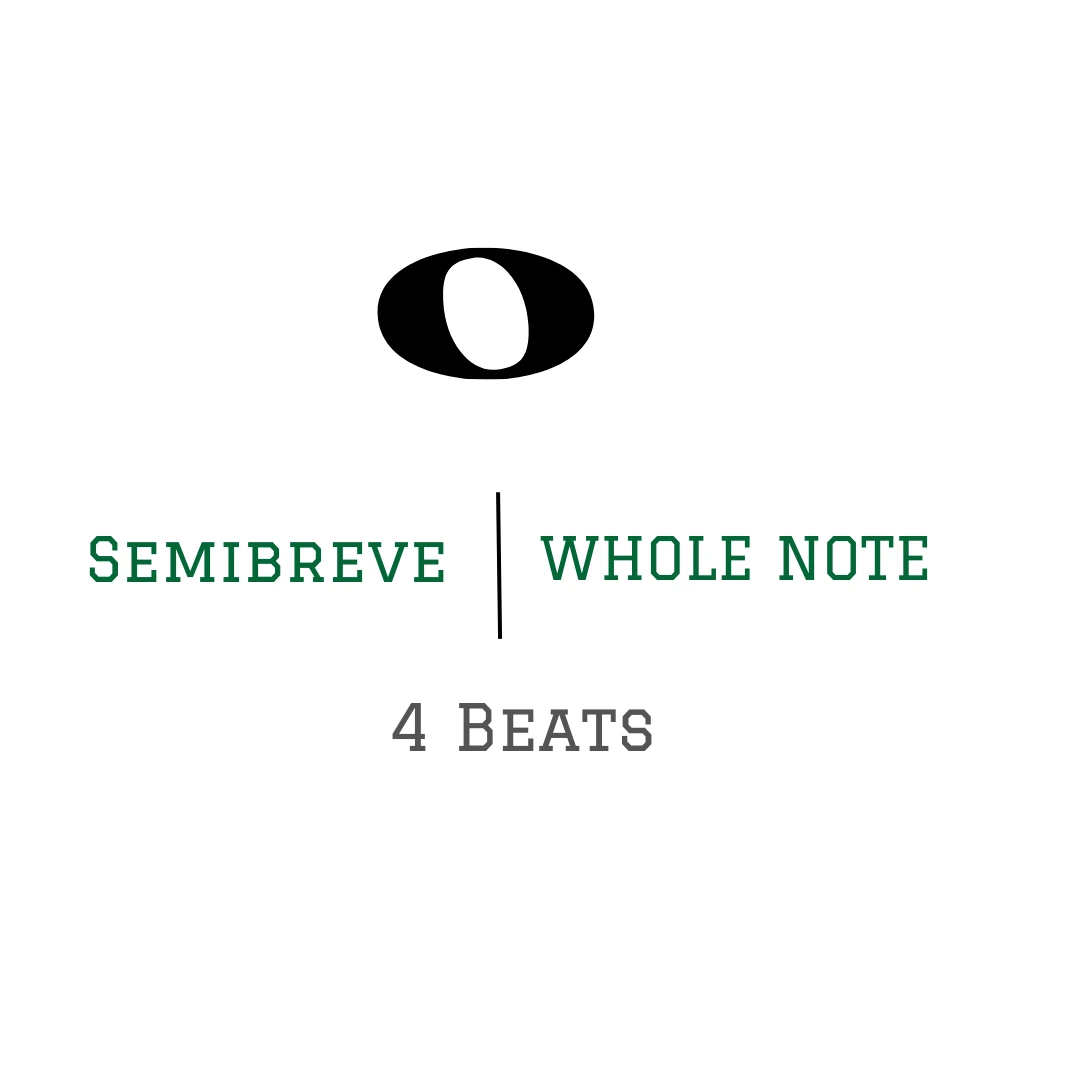
Semibreve/Whole Note
The highest value of a notation is 4 which means the note contains 4 beats. The note with the highest value is called the “semibreve.” It is also known as the “whole note.” The semibreve is denoted just by a “note head.” When singing the whole note, it consists of 1 clap and 3 empty counts. Every new clap indicates the starting of a new whole note. In the case of a whole note, after 3rd empty count, the following clap denotes a new whole note. The following image demonstrates how to write a whole note. The image is accompanied by audio to better understand the musical workings of the note.

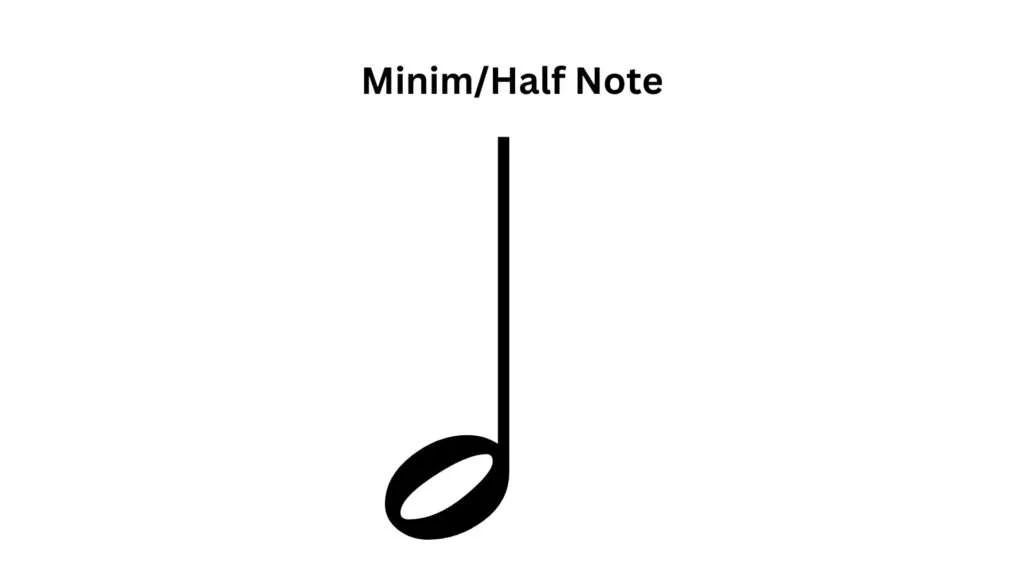
Minim/Half Note
The “minim” is absolutely half of the whole note thus it is also called the “half note.” The value of minim is 2 thus it comprises 2 beats in a note. The symbol denoting the minim note is a note head and a stem.
The minim consists of 2 alternate claps and 2 empty counts. Every new clap indicates the starting of a new note. In the case of a half note, after the 2nd empty count, the following clap denotes a new half note. The image below is the demonstration of the minim/half note and audio for the same.
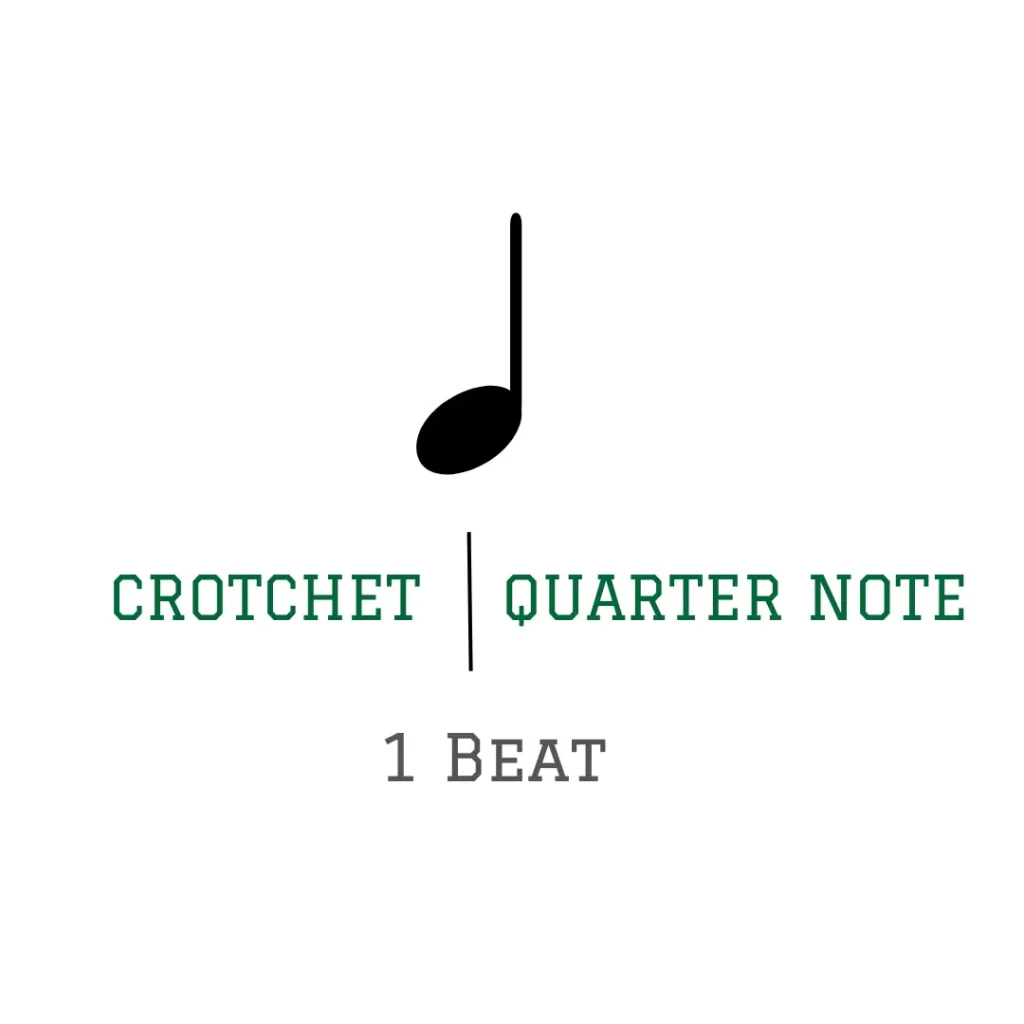
Crochet/Quarter Note
The “crotchet” or the “quarter note” has the value of 1 and comprises 1 beat. The symbol used to denote the crotchet is similar to the half note except the note head is filled. The crotchet consists of 4 claps and simultaneous 4 counts. Every new clap indicates the starting of a new note. In the case of a quarter note, each count is accompanied by a clap thus resulting in a new quarter note. The image below is the demonstration of the crotchet/ quarter note and audio for the same.
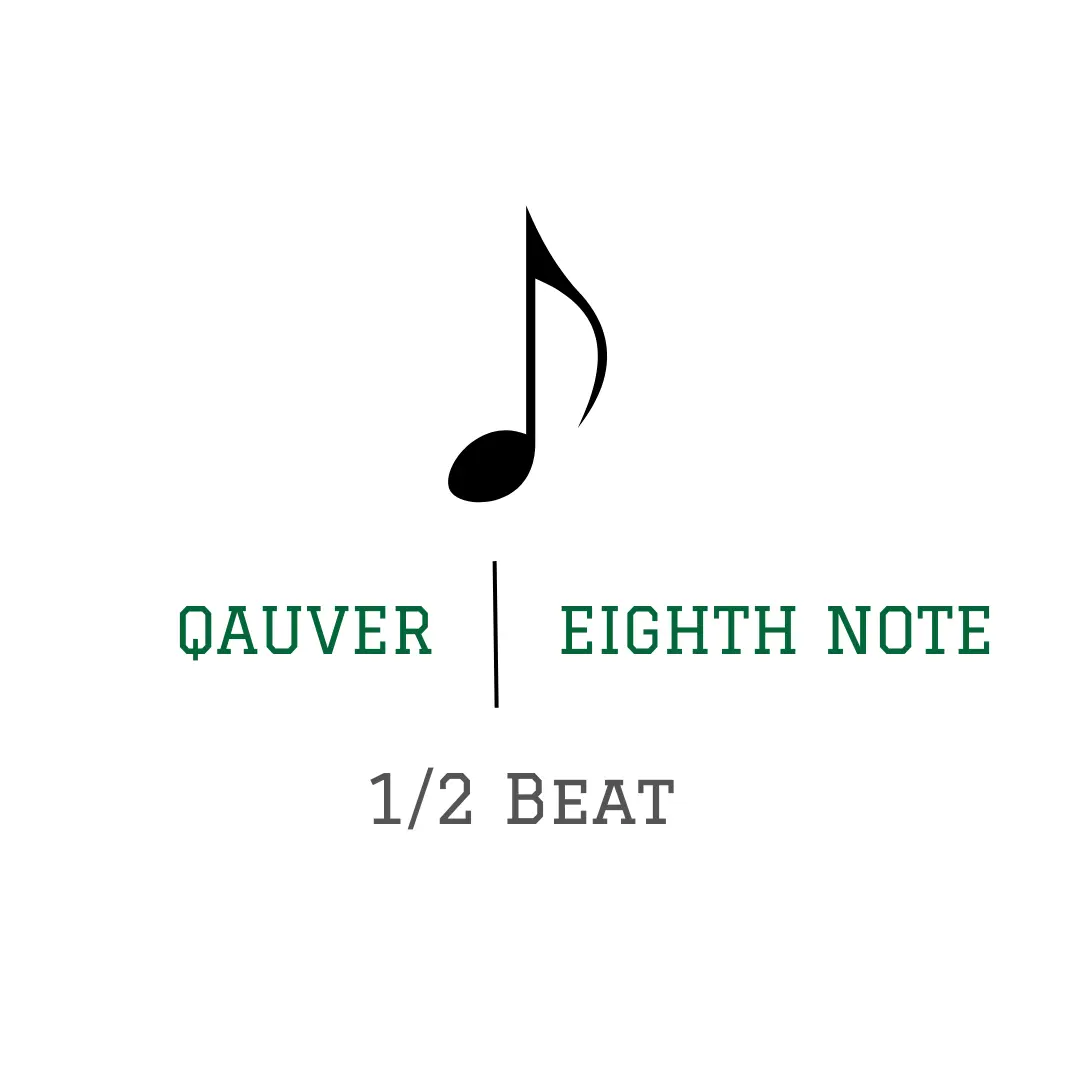
Quaver/ 8th Note
The quaver or the 8th note has the value of ½ and comprises ½ beats. The symbol used to denote is the crotchet note but with an addition of a tail on the top right-hand side. Every new clap indicates the starting of a new note. In the case of the 8th note, the note consists of 8 claps, and each count is accompanied by “n.” When writing the notes, the beam is used to join 2 quaver notes together. The image below is the demonstration of the quaver/8th note and audio for the same.
Semi-quaver/ 16th Note
Semi quaver as the name suggests the values and the beats are half of the quaver note. The note is also known as the 16th note. The value of the semi-quaver is ¼ which means it comprises ¼ beats. The symbol used for semi-quaver is similar to the quaver note with a tail added below the already existing tail of a quaver note. 4 note symbols are put together in a group using a beam and a line passing through them to represent the semi-quaver.
Every new clap indicates the starting of a new note. In the case of a 16th note, the note consists of 16 claps, and each count is accompanied by “e n a.” The image below is the demonstration of the semi-quaver/16th note and audio for the same.
The following image is the hierarchy of the notes based on their value, beats, and duration.

The table below is a quick summary or a cheat sheet for understanding the musical and the repetitive values.
| Notes | Value | Clapping |
| Whole Note / Semibreve | 4 | 1 |
| Half Note / Minim | 2 | 2 |
| Quarter Note / Crotchet | 1 | 4 |
| 8th Note / Quaver | 1/2 | 8 |
| 16th Note / Semi – quaver | 1/4 | 16 |
The Notes and The Keyboard
Now that we know about the instrument and have learned the musical notations. Let’s explore the notes when playing on the keyboard of the piano.
The notes on the keyboard are put into 6 groups. Each group consists of 12 keys representing the 12 notes. The 12 keys consist of 5 black keys and 7 white keys. As mentioned earlier each group starts with the note C and the note is located next to 2 consecutive black keys. When you are able to identify the note C try finding the Middle C.
The Musical Alphabets on the Piano
We previously learned that the pitches when written down are known as notes and the notes are symbolized by the musical alphabet. The alphabets used are A, B, C, D, E, F, and G. On the piano, the group of keys starts with the note C. The following keys use the alphabets D, E, F, and G then coming back to the alphabet A and ending the group with B. The image below shows the notes using the musical alphabet on a piano.
The Steps and the Notes
After learning about the half and the whole steps we can see that a black key is half a step away from the next white key. Though the E note and the F note on the piano are half steps apart as well and both are white keys. Knowing about the steps is extremely important for understanding the flats notes and the sharp notes on the piano.
The black keys are used for both sharp notes and flat notes. When determining whether the note is a sharp note or a flat note, we depend on the direction in which the keys are played. The black keys on the piano determine sharp notes when they are on the right-hand side of a natural note (white key). The sharp notes are C# D# F# G# and A#. Whereas the flat notes are the black keys on the piano on the left-hand side of the natural notes (white key). The flat notes are D♭, E♭, G♭, A♭, and B♭. Lastly to sum it up,
| C# and D♭ use the same black key |
| D# and E♭ use the same black key |
| F# and G♭ use the same black key |
| G# and A♭ use the same black key |
| A# and B♭ use the same black key |
Good posture
Before sitting to play the piano one must always warm up, and stretch. Maintaining a good posture is essential as it helps in relieving unnecessary tension that might accumulate in our bodies. A good harmony between the body of the musician and the instrument is a significant but often an overlooked aspect. A good posture for playing the piano has the following factors:
Aligning the Neck and the Back
One should focus on keeping their neck aligned with their back. If one leans their head forward it creates tension on their neck, shoulders, and upper back. This leads to a set of discomforts and problems. The correct alignment of the neck and the back is one of the ways to avoid the hunching of the back when playing the piano.
Relax Your Shoulders
When warming up one should always properly stretch their shoulders. Keep the shoulders down and relaxed. Stiff shoulders negatively affect the weight distribution on the arms and the bodies of the pianist and will hinder achieving the correct pressure that needs to be applied to the keys while playing the piano. One must have good body control and should be able to exercise the proper amount of body weight that one would want to exert on the piano.
Finding the Correct Position for the Spine
We already know that curving your back or hunching it is not correct when playing the piano but at the same time one should not sit straight like a statue. The spine should be in its natural state and retain its natural curvature. Having a neutral spine helps in avoiding any spine-related problems. it also brings ease to one’s body while playing the piano. Lastly, it gives a pleasant appearance to the pianist.
The Elbows and the Body
One should have a comfortable distance between the body and the elbows. The elbow should be at the level of the keyboard of the piano. one’s elbows should neither be very close to their body nor should they be ramrod straight. The wrong positioning of the elbows will put a strain on one’s shoulders and wrists thus restricting one’s movements when playing the piano.
Healthy Flexible Wrists
The wrists are one of the essential parts of our bodies when playing the piano. for having the full and the best range of motions of the wrists. First and foremost, one must not lock their wrists while playing the piano. The wrists should be up in other words they should be above the keyboard level. This will result in smooth wrist movements producing better fuller sounds when playing the piano.
No Flat Fingers
One’s fingers should always be slightly bent except the thumb when playing the piano. Since the fingers comprise several small joints, bending the fingers helps in avoiding any injuries to them. The bending of the fingers also provides agility to them which comes very handy when playing complicated portions of a composition.
Correct Placement of the Knees
This particular step is subjective in nature as the correct placement of the knees heavily depends on one’s build and overall stature and size. Apart from that the most important thing is to take care of the distance between the keyboard and one’s knees. If the knees are too close then the legs will be uncomfortably bent and collide with the pedals and will not give a proper footing and if they are too far it will result in the creation of unwanted tension in one’s body.
The Feet should be Flat and, on the Surface,
One should try to keep their weight on their buttocks and avoid putting too much pressure on their feet. Keeping the feet flat on the ground or on an elevated surface will bring stability and balance to the whole body. Which provides the pianist with a comfortable position when playing the piano.
Learn to Play the Five-Finger Scale
Finally, let’s get our hands dirty. As a beginner first learn to play the five-finger scale. Starting with the right hand.
Right Hand
First, find the middle C. Put your thumb on the middle C known as C4. The thumb will be regarded as finger #1 then place your index finger on the next white key the index finger will be regarded as finger #2. Follow the same pattern with the next three fingers and allot them a number. #3 for the middle finger, #4 for the ring finger, and #5 for the pinky finger respectively.
Try playing the notes in order of the fingers (1, 2, 3, 4, and 5). Then try playing it in reverse order (5, 4, 3, 2, and 1). Keep practicing till you get comfortable with the five-finger scales.
Left Hand
Next, you move to your left hand. Find the C which is below C4 that is C3. Put your finger #5 (pinky finger) on C3 and place your other four fingers on the next white keys respectively. Try playing the notes in order of the fingers (5, 4, 3, 2, and 1) then try playing it in reverse order. Initially, it might seem a bit uncomfortable but with practice, one should get better at navigating the keys.
For better understanding, the following image consists of a pair of hands that are numbered accordingly to play the piano.

Learn to Play the C major or Do re-mi with the Thumb Tuck
Learning to play C major scale or Do Re Mi is similar to the five-finger scale except we will work on the thumb-tucking technique.
Find the middle C also known as C4 place your thumb on C4. Place the rest of the fingers on the following white keys. One should start with the thumb on C4 or “Do” then the index finger on D4 or “Re”, and the middle finger on E4 or “Mi”. Then bring the thumb from under the index and the middle finger and play the key F4 or “Fa”. Then crossover or shift the whole hand and play the key G4 or “So” with the index finger followed by the middle finger playing A4 or “La”, play B4 or “Ti” with the ring finger and finally play C5 of “Do” with the pinky finger.
To sum it up the order of the movement of the hand will be (1, 2, 3, 1, 2, 3, 4, and 5). Again, like any other exercise, a good amount of practice will help in bringing confidence.
Playing with Both Hands
One of the most difficult tasks when learning piano is hand independence and coordination. Thus, to start one’s journey of playing the piano with both hands a simple exercise can be carried out that is to play the five-finger scales with both hands simultaneously. A quick recap in the previous segment we had labeled the fingers as follows:
| Finger #1 is equal to the thumb |
| Finger #2 is equal to the index finger |
| Finger #3 is equal to the middle finger |
| Finger #4 is equal to the ring finger |
| Finger #5 is equal to the pinky finger |
When playing upwards or towards the right-hand side the order of the movement of the fingers should be as follows:
For the right hand, it should be (1, 2, 3, 4, and 5) the notes that will be played are C, D, E, F, and G and for the left hand, it should be (5, 4, 3, 2, and 1) the notes that will be played will be C, D, E, F, and G.
When playing downwards or towards the left-hand side the order of the movement of the fingers should be as follows:
For the right hand, it should be (5, 4, 3, 2, and 1) the notes that will be played are (G, F, E, D, and C) for the left hand it should be (1, 2, 3, 4, and 5) the north that will be played are (G, F, E, D, and C). This particular technique and exercise can be a bit daunting and time-consuming but one must be patient and persevere for a good result.
Start Learning Chords
After learning the five-finger scale and the C major scale One should try learning a few basic chords and starts with the easiest such as C major chord.
C major chord:
To play the C major chord3 fingers are used. On the right hand, place finger #1 (thumb) on C, finger #3 (middle finger) on E, and finger #5 (pinky finger) on G. For the left-hand place finger #5 (pinky finger) on C finger #3 (middle finger) on E and finger #1 (thumb) on G then press all the keys at the same time.
A few of the chords with the same finger movements are as follows
G major chord:
To play the G major we use 3 fingers. On the right hand, place finger #1 (thumb) on G, finger #3 (middle finger) on B, and finger #5 (pinky finger) on D. For the left-hand place finger #5 (pinky finger) on G, finger #3 (middle finger) on B and finger #1 (thumb) on D. To play the chord press them all together.
A minor chord:
To play the A minor we use 3 fingers. On the right hand, place finger #1 (thumb) on A, finger #3 (middle finger) on C, and finger #5 (pinky finger) on E. For the left-hand place finger #5 (pinky finger) on A, finger #3 (middle finger) on C, and finger #1 (thumb) on E. To play the chord press them all together.
F major chord:
To play the F major we use 3 fingers. On the right hand, place finger #1 (thumb) on F, finger #3 (middle finger) on A, and finger #5 (pinky finger) on C. For the left-hand place finger #5 (pinky finger) on F, finger #3 (middle finger) on A, and finger #1 (thumb) on C. To play the chord press them all together.
Try Learning Songs
After learning the basic chords and working on playing with both hands try dabbling in some songs. Start with the simple songs; As simple as happy birthday other songs such as “Imagine” by John Lennon. When choosing a song try to choose songs that have familiar chords.
Refer to the music sheets when practicing. It helps in improving the understanding of the musical notations and reading skills of a musician. Initially, the songs can look a bit daunting but one must break the songs into small sections and learn bit by bit. Patience is extremely important when learning the first few songs on the piano. With daily practice, one will definitely end up getting good results.
Ear training
To play the correct melody one should also be able to recognize the melody. One of the most essential parts of music is ear training. Ear training consists of recognizing keys, and chords by listening to them. A pianist needs to devote enough time to ear training.
Tips for Encouragement for Aspiring Pianists
Take One Step at a Time
Do not rush into learning songs or big musical compositions, it can easily overwhelm an individual. The piano can be a bit challenging in the beginning thus first focus on getting familiar with the piano.
Work on Basics
Focus on the basics and work on your basic piano skills such as hand coordination ear training etc. Strong basics will definitely help and make learning new advanced skills on piano easier.
Listen and watch different pianists
Listening to and watching other pianists is a great way of learning and improving one’s skills. One can study their body language and skills while performing. It also helps in increasing the knowledge and repertoire of pianists in different piano compositions.
Conclusion
The piano is indeed one of the most beautiful instruments. It is also one of the most extensively used instruments in the musical world. One of the beauties of the piano is that unlike other instruments such as guitar or violin the piano gives rewards from the very first day. Just with a few skills, one can start making sweet, clear, and melodious notes from the very beginning. Which makes the piano a fun instrument to learn. Lastly don’t be afraid to try new things. Keep listening and loving music.